Optimize your images in a few clicks:

  1. 1️⃣ Download and install the image optimizer for Windows.
  2. 2️⃣ Add single photos or whole folders in one batch.
  3. 3️⃣ Pick a quality level or a target size in KB, then click Start.
Eugene - CEO at SoftOrbits, Candidate of Technical Sciences, has more than 16 years of expertise in software development, photo and multimedia applications, enhancing and transforming digital images and videos.
📅 Last updated on:  2026-06-13

Looking for an image optimizer download that actually works offline on a PC? Most "optimizers" in the top results are either Mac-only, a website that wants you to upload your photos, or a WordPress plugin. None of those help when you have a folder of 300 JPGs and a slow connection. Batch Picture Resizer is a desktop image optimizer for Windows 10 and 11. It compresses JPG, PNG, and WEBP files in batch, keeps the originals untouched, and can shrink a photo to an exact size in KB. Everything runs on your machine, no upload.

What you will learn
Apply in 5 minutes Saves 50-80% file sizeEasy

How to optimize images in batch on Windows

Download and install the image optimizer

Grab the image optimizer free download for Windows and run the installer. No account, no sign-up, the trial runs right after setup.

Add single images or a whole folder

Click Add Files or drag a folder onto the window. Hold CTRL to pick several files at once; when you add a parent folder, the subfolder structure stays intact.

 Add images to the optimizer..

Choose quality, format, or a target size in KB

Set the JPEG quality, convert to PNG or WEBP, or switch the width field to KB and type the file weight you need. Most photos look the same at quality 80-85 and lose half their size.

 Choose optimization options..

Preview the result and pick an output folder

Check the before and after preview on the left, then choose where the optimized copies are saved. Originals are left alone.

 Preview the optimized image..

Click Start to process the whole batch

The program runs through every image using all CPU cores and writes the finished files to your output folder.

 Start the batch optimization..

Batch Picture Resizer Batch Picture Resizer

Batch Image Resizer is an easy, user-friendly tool that helps you resize multiple photos, convert, flip, mirror, or rotate them in batch mode.

Video Tutorials

Is there an ImageOptim for Windows?

TL;DR

Not the same app - ImageOptim is Mac-only and the team says so on their own site. On Windows you use an equivalent like Batch Picture Resizer, RIOT, or Caesium that does the same quality-safe compression.

Searching for an ImageOptim Windows build is the single most common reason people land on a page like this. ImageOptim is a well-loved Mac utility, and Windows users keep looking for "ImageOptim for Windows" only to find there is no Windows build. The ImageOptim team confirms it on their own versions page, which points Windows and Linux users to other tools instead.

The job ImageOptim does, strip bloat and recompress images without a visible quality drop, is not Mac magic. A Windows image optimizer like Batch Picture Resizer does the same thing, plus batch folders and a target-KB mode that ImageOptim never had. If you only want lossless PNG crushing, RIOT and FileOptimizer are free options worth knowing about too, and we cover where each one fits further down.

Does Windows 10 or 11 have a built-in image optimizer?

TL;DR

No. Windows has no real batch optimizer. Paint can resize one file, and Office "Compress Pictures" can even make a file larger, so a dedicated tool is the reliable route.

Windows ships with no tool that compresses a batch of images to a smaller file size while keeping the dimensions. Paint resizes one image at a time by pixels, which is not the same as optimizing. The Office picture-compression option is closer, but it is unreliable and can even return a bigger file than the original when its default resolution upsamples instead of compresses.
People do stretch the built-in tools. The common workarounds are resizing dimensions in Paint, zipping a folder, or re-saving a PNG as JPG. Each one helps a little, but none compresses a batch to a quality or size target in a single pass, and zipping does almost nothing to already-compressed JPGs. That gap is exactly why dedicated image optimizers exist. You add files, set quality or size target once, and the program applies it to every image. For our own batch needs we built the workflow above; if you only need to resize by dimensions, the image size converter guide below covers that angle.

How to reduce an image to a specific size in KB

TL;DR

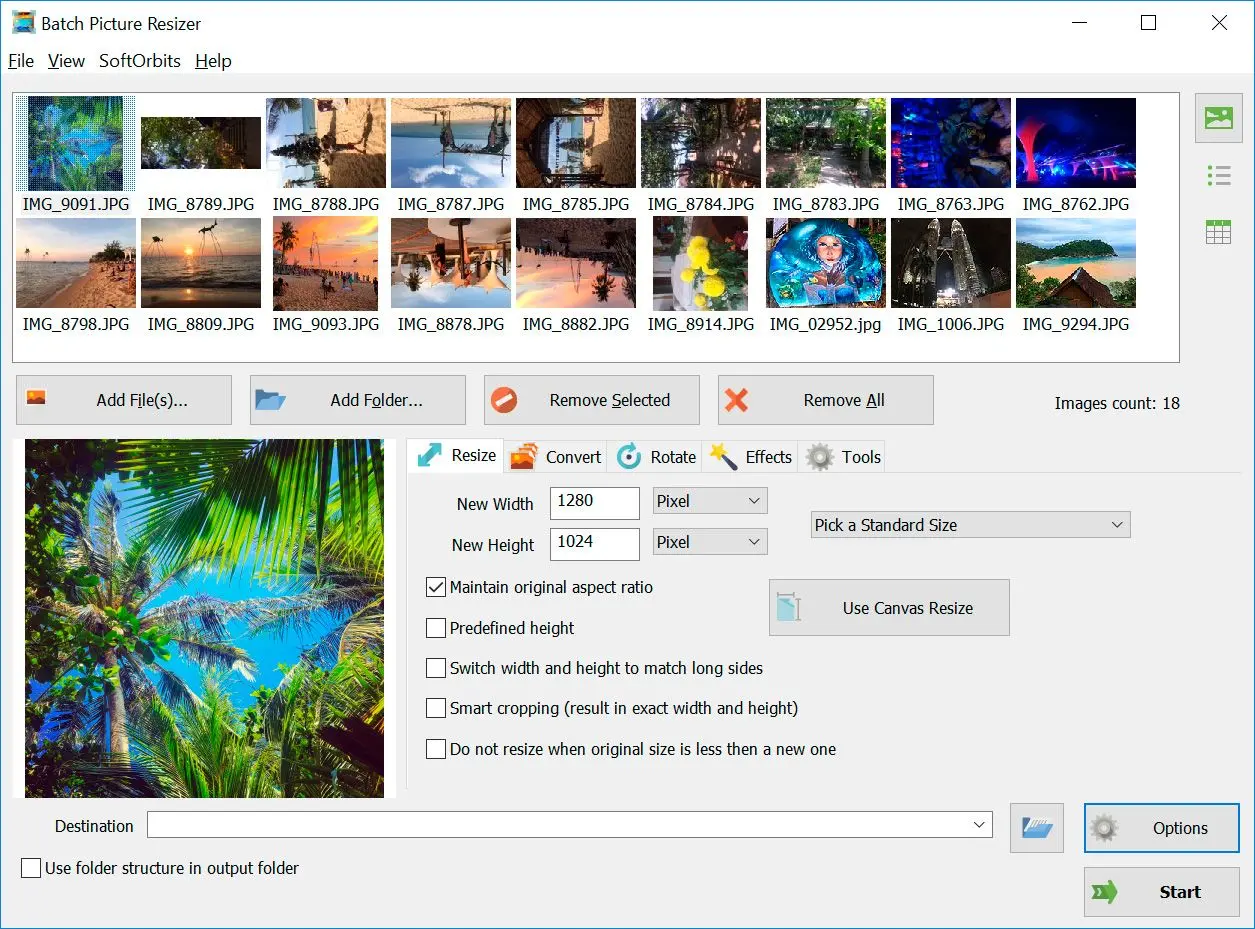
Switch the size unit to KB, type your target (say 200 KB), and the optimizer auto-tunes JPEG quality (and downscales only if it must) to land at or under the limit.

Upload forms are the usual culprit. Visa portals, job applications, and government websites cap photos at 100 KB, 200 KB, or 500 KB, while a single phone or DSLR photo can be 5 to 30 MB. Trying to hit a number by eye is painful. A camera-club member on the Adobe support forum described the exact problem: 60 JPGs at up to 2 MB each that all had to come down to about 0.7 MB for a web gallery, with no clear way to do it in one pass.

 Set a target file size in KB..

In Batch Picture Resizer the width and height fields include a KB unit. Pick it, and only the target-weight field stays. The program tries JPEG quality levels in memory, and downscales from the original only if quality alone cannot reach the goal, so it writes the file just once. There are presets for 20, 50, 100, 200, 500 KB and 1, 2, 5 MB. It outputs JPEG in this mode, which is the right format for a photo upload anyway. For a KB-only walkthrough, see our reduce image size in KB guide.

Can you compress images without losing visible quality?

TL;DR

Yes, within reason. At JPEG quality 80-85 the difference is invisible to the eye while the file drops 50-70%. "Lossless" keeps every pixel but saves less; "visually lossless" lossy saves far more.

"Compress without losing quality" is a fair promise as long as you know what it means. Truly lossless compression keeps every pixel identical and still trims the file, but only by stripping hidden overhead, usually 5 to 25%. The bigger wins come from lossy compression tuned so the loss stays below what your eye can see. Image-tooling vendors like Tinify make the same distinction.

How much smaller do files actually get?

For typical photos, expect a 50 to 80% reduction at sensible quality settings, more if you also convert to WEBP. A 6 MB JPEG often lands near 1.5 MB with no obvious change on screen. The honest catch: re-compressing an already-compressed JPEG a second time costs quality for almost no extra saving, so optimize from the original when you can.

Lossy vs lossless compression: which should you pick?

TL;DR

Lossless for logos, screenshots, and line art where every pixel matters. Lossy for photos, where a small, invisible quality trade buys a much smaller file.

The choice is not about good versus bad. It is about the image. Photographs have so much detail that the eye never registers a careful lossy pass, so lossy (JPG or lossy WEBP) is the right call and the savings are large. Graphics with sharp edges, flat color, or text (logos, UI screenshots, diagrams) can show artifacts under lossy compression, so lossless PNG or WEBP keeps them clean. A good optimizer keeps that choice per batch instead of forcing one mode on everything.

Why does my PNG barely shrink?

TL;DR

Because PNG is always lossless, so a "compress" pass only saves a little. To shrink a photo saved as PNG, convert it to JPG or lossy WEBP instead.

This trips up a lot of people. They run a heavy 8 MB PNG through optimizer, expect it to halve, and watch it drop by maybe 10%. That is normal. PNG stores every pixel exactly, so there is little to remove without changing the format. If the PNG is actually a photo, convert it to JPG or lossy WEBP and the file collapses. Keep PNG only where you need transparency or pixel-perfect graphics. When you do need to keep the PNG and its transparency, a palette-based compress PNG tool can still cut its size right in the browser. A batch tool that converts formats handles this in the same run.

How to convert images to WEBP for smaller files

TL;DR

WEBP is usually around 26% smaller than PNG, and smaller than JPG at the same quality. Add the files, set the output format to WEBP, pick lossy or lossless, and run the batch.

WEBP is the easy extra win once your quality and size are sorted. Google's own WebP documentation reports lossless WEBP around 26% smaller than PNG and lossy WEBP well below comparable JPG. For a website, that is faster load times for free. In Batch Picture Resizer you set the output format to WEBP and choose lossy or lossless, then optimize the whole folder at once. Browsers have supported WEBP for years, so there is little downside for web images. Our JPG resizer page covers the JPG side if you need both.

Will optimizing strip my EXIF or copyright data?

TL;DR

Only if you let it. Some free tools wipe all metadata by default, which can erase copyright and GPS. Pick one that keeps EXIF, or strips it selectively, on your command.

For photographers this matters. Several free compressors strip every scrap of metadata to save bytes, which also deletes your copyright field, camera data, and GPS tags. That is fine when you want a clean file for the web and a real problem when you need provenance. The fix here is control. Choose one that keeps EXIF, strips only GPS for privacy, or removes everything on purpose, never one that decides for you silently. Test one file and check its properties before you run a folder of 500.

What to look for in a Windows image optimizer

TL;DR

Batch processing, a real quality or KB control, format conversion (JPG/PNG/WEBP), offline processing, and metadata options. That is the short checklist; price comes after.

A quick honest rundown of the field. Caesium is a solid free, open-source compressor with a live preview, though it has no target-KB output and no command line. RIOT gives power users granular control but its interface looks dated and batch is limited. FileOptimizer is great for lossless work across many formats but has no quality slider. Online tools like TinyPNG or Squoosh are perfect for one or two files, but you upload your images and Squoosh handles one at a time.

When you need batch folders, a target-KB mode, format conversion, and everything staying on your own machine, that is where Batch Picture Resizer sits.

Pros:

Batch-optimizes hundreds of JPG, PNG, and WEBP files in one run

Target-size mode hits an exact weight in KB for forms and email

Runs offline with a command-line option for scripted jobs

Cons:

Windows only, no macOS or Linux build

Target-KB mode outputs JPEG, not PNG

Trial first, then a paid license (see pricing on the product page)

You can compare it directly with the rest of the line on the Batch Picture Resizer product page or grab the picture resizer download if resizing by dimensions is all you need.

Batch Picture Resizer Batch Picture Resizer

Batch Image Resizer is an easy, user-friendly tool that helps you resize multiple photos, convert, flip, mirror, or rotate them in batch mode.

Pitfalls when optimizing images on Windows

TL;DR

Most bad results come from compressing PNG photos, cranking quality to 100, uploading private files to web tools, or stripping metadata you needed.

✔️ Compressing a PNG photo and expecting a big drop.

A photo saved as PNG barely shrinks because PNG is lossless. Convert it to JPG or lossy WEBP and it falls to a fraction of the size. Keep PNG for transparency and graphics, as the format comparison on Tinify's blog lays out.

✔️ Setting JPEG quality to 100.

At 100 the file barely shrinks and you keep detail no one can see. Drop to 80-85. You will not see the difference. The file shrinks by half or more.

✔️ Trusting Office "Compress Pictures".

It is hit or miss. People on a Microsoft Q&A thread report it returning a file larger than the original when the default resolution upsamples. Use a dedicated optimizer and set the quality yourself.

✔️ Expecting a built-in app to shrink files without resizing.

There is none. On a Microsoft Q&A thread the advice is to reach for a third-party tool, because Windows cannot reduce a JPG or PNG file size on its own while keeping the dimensions.

✔️ Chasing both PNG-level detail and tiny files at the same time.

You rarely get both at once. As one user worked out across an r/AV1 thread on quality-versus-storage, lossless keeps every pixel but stays big, while lossy gets small by trading detail you usually cannot see. Pick the mode that fits the job.

✔️ Uploading sensitive photos to an online optimizer.

Client work, ID scans, and confidential images should never go to a website. An offline desktop tool keeps them on your machine, which is why many people on the Adobe community ask for a local batch route instead of a web service.

✔️ Stripping all metadata by accident.

Some tools delete EXIF and copyright by default. If you need provenance, pick a tool that lets you keep it and check one file's properties before the batch.

✔️ Re-compressing the same JPEG over and over.

Each pass degrades the image with almost no extra saving. Always start from the original, not a file you already compressed yesterday.

Batch Picture Resizer Batch Picture Resizer
Record a Google Meet with the built-in feature, Xbox Game Bar, or a desktop screen recorder - even as a guest. Steps, audio tips, and the legal rules.


🙋Frequently Asked Questions

For a free, open-source pick, Caesium handles batch JPG and WEBP well. If you need a target-KB mode, format conversion, and a command line, Batch Picture Resizer covers more in one app with a free trial.

Photos usually drop 50 to 80% at sensible quality, and more if you convert to WEBP. Graphics and already-compressed files save less. A 6 MB JPEG often lands near 1.5 MB with no visible change.

Yes. Batch Picture Resizer is a desktop app that processes everything locally, so it works fully offline and your files never get uploaded anywhere.

Yes. Larger images and bigger batches take longer and use more disk space. Processing runs on all CPU cores, so a folder of small JPGs finishes quickly.

Usually yes. Lossy WEBP is typically smaller than a JPEG of matching quality, and lossless WEBP is about a quarter smaller than PNG, which is why it is popular for the web.

Not unless you ask it to. Quality-based compression keeps the same pixel dimensions; resolution only changes if you resize or if a KB target cannot be met by quality alone.

Sources