Make a Stencil Online

Upload a photo and turn it into a clean black-and-white stencil right in your browser. Nothing is uploaded - it all runs on your device. Download the result as a PNG you can print, cut, or transfer.

Picture Stencil Maker Online & Software - Free Download

  1. 1️⃣ Drop a photo into the stencil maker above and download a black-and-white PNG.
  2. 2️⃣ Or install Sketch Drawer on Windows for presets, batch work, and fine control.
  3. 3️⃣ Add bridges so letter centers and islands hold together when you cut.
Sketch Drawer Screenshot.

A stencil maker turns a normal photo into a high-contrast, cut-ready design for anything from a coffee mug to a carved Halloween pumpkin. You have two honest paths here. The free in-browser stencil maker at the top of this page traces a photo into a black-and-white PNG without uploading anything, which is handy now that the old black-and-white toggle in MS Paint is gone from recent Windows builds. When you need batch jobs and tighter control, get the stencil maker software download free for Windows - Sketch Drawer.

What you will learn
Apply in 5 min Saves 1 hEasy

How to make a stencil online in your browser

TL;DR

Use the stencil maker at the top of this page. Drop a photo and it traces the image into a clean black-and-white PNG. Print it, cut it, or transfer it. Nothing is uploaded, and the conversion runs on your device, so the photo never leaves your computer.

The online stencil maker is the fastest way to test an idea. Drop a JPEG or PNG onto the tool and it traces the picture to a two-tone stencil. Move the speckle and detail sliders if you want a simpler outline or a finer one, compare the preview, then download the result as a PNG. It fits a single graphic, a quick craft test, or any time you do not want to install desktop software.
There is a real privacy angle too. Some free stencil sites process your upload on their servers, and a few even show free users' designs in a public gallery by default. If you want a softer, artistic look instead of a hard-edged stencil, you can convert a photo to line art with a related tool. For one image or an occasional project, the browser path is usually all you need. For many files at once, sketch presets, and finer settings, the Windows program below does more.

How to make a stencil from a photo with Sketch Drawer (Windows)

Install Sketch Drawer on Windows

Grab the trial and run the installer to set it up.

 Install Sketch Drawer stencil maker software..

Add your photo and pick a preset

Click Add Files, load the picture, then choose a preset such as Classic, Detailed Sketch, or Realistic. A higher-resolution photo gives the tracer more to work with.

 Choose a stencil preset in Sketch Drawer..

Fine-tune contour and hatching

Adjust the contour, hatching, and stroke settings while you watch the live preview. The goal is bold, connected lines, not a web of thin detail.

 Tune the sketch lines for a cuttable stencil..

Add a watermark if you need one

You can drop a logo or mark onto the result before saving, which helps if you sell or share the design.

 Add a logo or watermark to the stencil..

Save your stencil

Export the high-contrast image, then print it, cut it, or load it into your cutting machine.

 Save the finished photo stencil..

Sketch Drawer Sketch Drawer

How do you set the threshold so the stencil actually cuts?

TL;DR

Threshold is the slider that decides which pixels turn black and which turn white. Set it too high and you capture so much detail that the bridges are too thin to survive cutting; set it too low and shapes melt into blobs. Start in the middle, then nudge it while watching the preview until the design reads clearly with solid, connected lines.

Most failed stencils trace back to the threshold setting. The photo that looks great on screen often hides a problem. The tracer keeps every freckle, hair, and shadow, so the cut path turns into a maze. Online tracers like Rapid Resizer's photo-to-pattern tool hand you a Threshold control plus Edges and Thin sliders for exactly this reason: a raw snapshot rarely cuts well, so you tune those settings until the shapes read clearly. A perfect pattern almost never comes straight from a photo.

A simple test saves a lot of wasted vinyl. Pick a high-contrast photo to begin with, push the threshold until the main shapes are obvious, then ask: could I cut every black region without it falling apart? If the answer is no, simplify before you export.

ThresholdWhat you getFix
Too highSpider-web of thin lines, fragile bridgesLower it; remove fine detail
Too lowBlobs with no readable shapeRaise it; pick a sharper photo
BalancedBold, connected, cut-ready designExport and cut

How do you keep letters and islands from falling out?

TL;DR

An island is any enclosed area with no connection to the rest of the stencil, like the center of an "O" or the pupil of an eye. When you cut, those islands drop out and leave a hole. The fix is bridges: thin tabs that reconnect each floating piece to the main design before you cut.

Bridges are the part beginners miss most often. You design a clean stencil, cut it, and the middle of every letter falls onto the floor. Stencil makers who work with cutting machines call the solution bridging, and a clear walkthrough of the idea lives on the BayStencil bridging guide.

You can add bridges by hand in a vector editor. Open the stencil in software like Inkscape, then draw small rectangles that link each island to the surrounding material. The Inkscape tracing tutorial covers the trace step that comes first. Keep bridges wide enough to hold the material but narrow enough to hide in the design. Text and faces need the most bridges; bold silhouettes often need none.

How do you clean up a busy background?

TL;DR

A busy background turns a stencil into noise. Crop tight to your subject, or remove the background before you trace, so the tool only converts the shape you care about. A plain subject on a clean field gives a stencil with far fewer stray pieces to weed.

When people complain that a photo "traced into a mess," the background is usually the culprit. Leaves, fabric folds, and shadows all become separate black shapes, and each one is another piece you have to weed out by hand. Start with a photo where the subject stands out, or isolate the subject first.

Two quick habits help here. Shoot or pick the image with even lighting and a simple backdrop. Then crop hard before tracing, so the tool spend its detail budget on the part you will actually cut. If the subject and background share similar tones, raise contrast first; the tracer separates light from dark, not object from object. For portraits and logos where you want clean edges rather than fill, dedicated photo to line drawing software can give you a cleaner starting point.

How do you make a multi-layer color stencil that stays aligned?

TL;DR

A multi-layer stencil splits the design into one cut per color, which you then line up and paint in sequence. Alignment is the hard part. Even a millimeter of drift between layers blurs the result. Add registration marks to every layer so each sheet snaps to the same position.

Single-color stencils are forgiving. Color stencils are not, because the picture only looks right when every layer sits exactly where it should. Crafters who do this on cutting machines warn that a 1 mm shift between layers ruins an otherwise clean design.

The reliable trick is registration marks, small crosses or corner ticks that appear in the same spot on every layer. Cut them into each sheet, align them on the surface, and paint light colors first, dark colors last. Start with 2 or 3 layers before you attempt a portrait; the alignment skill matters more than the layer count.

Which format should you export - SVG, PNG, or PDF?

TL;DR

Export SVG for cutting machines like Cricut and Silhouette, because they need vector paths, not pixels. Use PNG when you want to print the stencil and cut it by hand, and PDF for tiled large-format printing. Sending a raster PNG into Cricut Design Space is the usual reason a photo traces into hundreds of unweedable fragments.

The format you choose depends on how you will cut. Cutting machines read vector files, so SVG is the right export for Cricut and Silhouette workflows. Cricut's own help lists unsupported items in uploaded files, and pushing a complex photo through its built-in trace often spits out tiny fragments, so prepare a clean vector first.
If you are printing and cutting by hand, PNG or PDF is simpler. PNG keeps a crisp black-and-white image for a single sheet; PDF tiles a large stencil across several pages for a wall or a banner.

FormatBest forNote
SVGCricut, Silhouette, laser/CNCVector paths; cleanest cut
PNGPrint and hand-cutRaster; one sheet
PDFLarge-format tiled printingMulti-page for walls

What can you cut a stencil from - Mylar, cardstock, vinyl?

TL;DR

Match the material to the job. Mylar is reusable and washable for repeat work like airbrushing and signage; cardstock is cheap for one-time paper stencils; adhesive vinyl sticks flat for crisp edges on mugs, shirts, and walls. Thicker material needs bolder bridges to stay rigid.

The design is only half the result; the material decides how long the stencil lasts and how clean the edges stay. Mylar film is the workhorse for reusable stencils because it wipes clean and holds its shape after many passes. Cardstock and freezer paper are fine for a single project on a budget. Adhesive vinyl, the common choice for Cricut users, sticks to the surface so paint cannot bleed under the edges.

Whatever you pick, remember that thicker and stiffer material wants wider bridges. A delicate paper stencil tolerates thin tabs; a rigid mylar sheet for spray paint needs sturdier connections so the islands do not flex out of place.

Who uses a stencil maker, and for what?

TL;DR

Crafters and small sellers reach for a stencil maker, and so do hobbyists and classroom teachers. Common jobs run from t-shirts and tote bags to mugs and tumblers, plus wall art and airbrush templates, with pumpkin carving spiking every fall. The same photo-to-stencil flow serves all of them; only the material and cut method change.

A picture stencil maker is not one audience. Sign painters and woodworkers turn logos into spray templates or a clean outline for routing. Cricut and Silhouette crafters cut vinyl for shirts, tumblers, and decals. Airbrush artists need reusable mylar templates with fine, connected detail. Teachers and parents make quick holiday shapes, and pumpkin carvers convert a face photo into a high-contrast carving guide.
The workflow is the same across all of these. You convert a photo to a bold black-and-white design, add bridges, then cut it in your chosen material. What changes is scale and finish, which is exactly where desktop software does more than a one-off online pass.

Why Sketch Drawer fits photo-to-stencil work on Windows

TL;DR

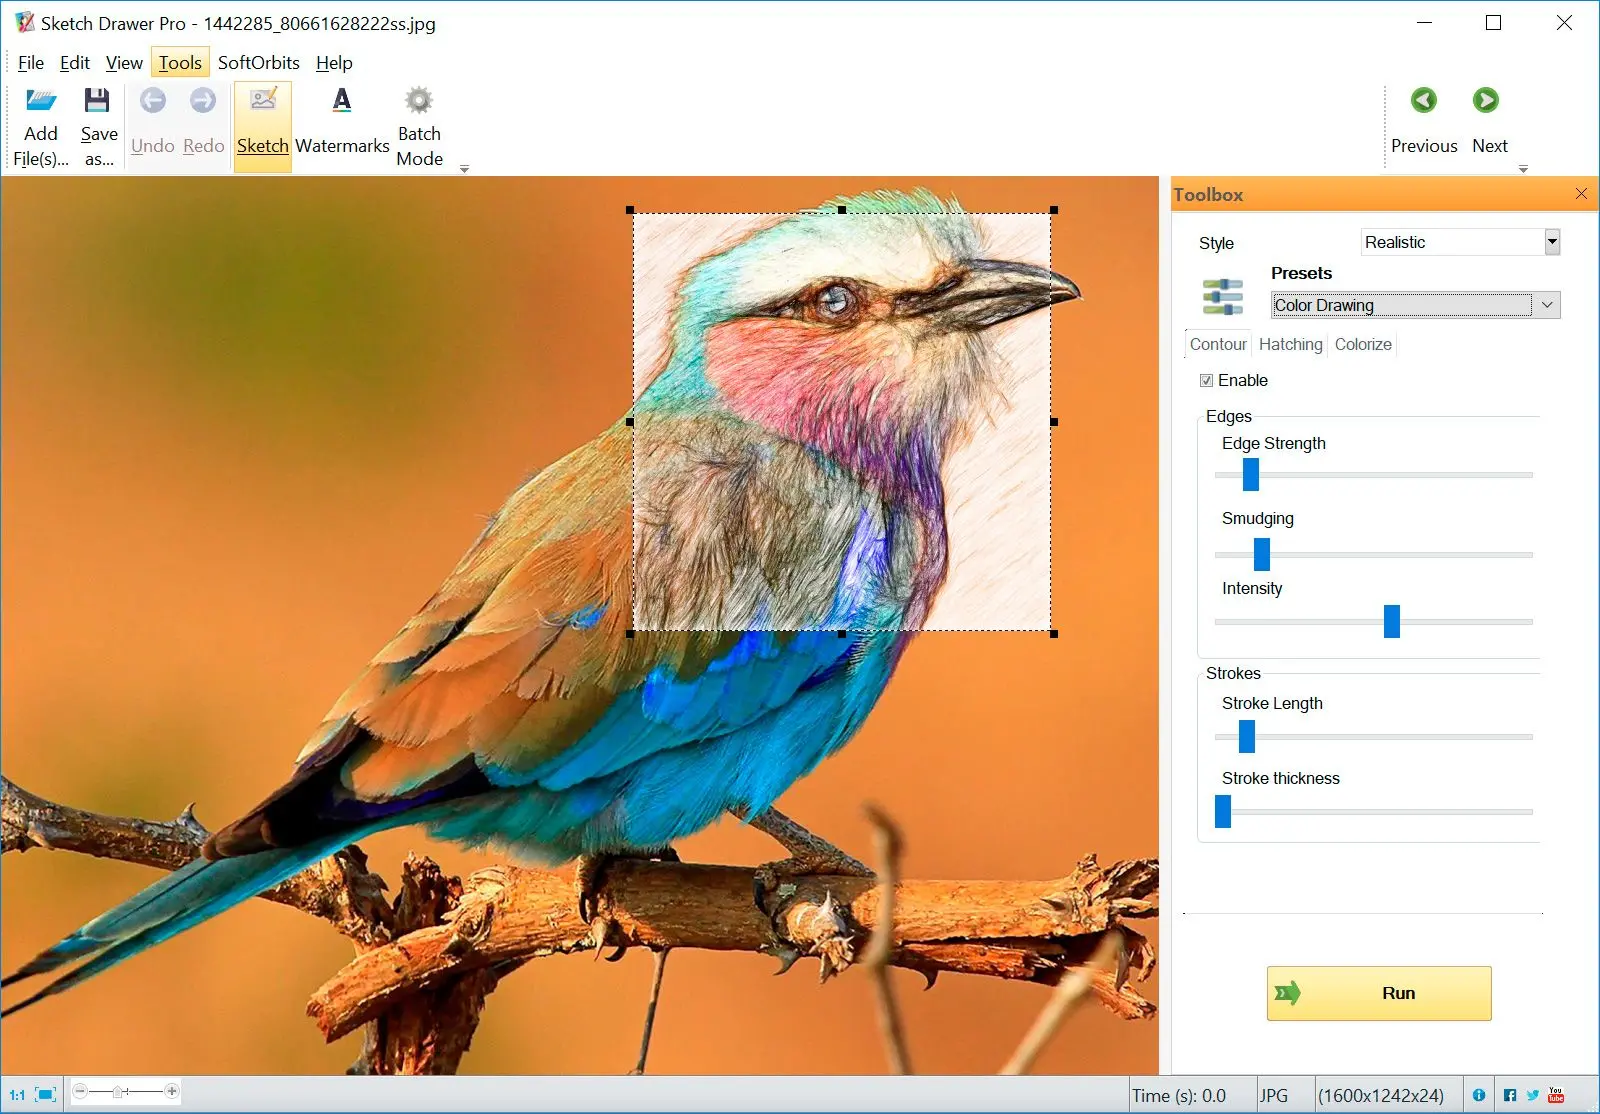
Sketch Drawer is a Windows program that converts photos into sketch and stencil-style art with presets and a live preview. It fits people who want batch processing and finer control than a quick browser tool. The payoff shows up when you make stencils often, not once.

For occasional single images, the online tool above is enough. When you make 10 or 20 stencils in a sitting, a stencil creator desktop program saves real time. Sketch Drawer is the free picture stencil maker download for Windows that opens a photo, applies one of 30+ presets, and lets you tune the look, then exports a high-contrast result you can cut or print. It imports JPEG and PNG, plus TIFF and RAW camera files, so you can work straight from the original shot. The same engine also handles photo to sketch conversions when you want shading instead of a flat stencil.

Pros:

Batch mode applies the same settings to a whole folder of photos at once

Presets (Classic, Detailed Sketch, Realistic) plus stroke and edge controls

Runs locally on Windows with an optional watermark on the saved file

Cons:

Windows only, not a web app or mobile tool

It is a sketch and stencil engine, not a full vector editor for manual node work

When you process a whole folder of photos with the same preset, use Sketch Drawer - the stencil maker program free download for Windows. For a single quick graphic, the browser tool covers it.

Pitfalls when making a stencil from a photo

TL;DR

Most ruined stencils trace back to the same few mistakes. The usual culprits are too much retained detail and missing bridges. A cluttered background or the wrong export format will break the cut too. The result looks the same every time, a design that falls apart when you cut it.

✔️ Skipping bridges on text and faces.

Letters and portraits are full of islands, and without bridges the centers drop out. Add the tabs before you cut, not after, and keep them wide enough to survive the blade.

✔️ Trying to prep the image in a tool that has no contrast control.

People reach for a built-in editor and find it cannot push a photo to clean black and white. One Windows Paint help thread shows a user stuck because the app has no brightness or contrast panel at all. Pick a tool with a real threshold control before you trace.

✔️ Confusing grayscale with a true black-and-white stencil.

A grayscale image still has gray tones, and a cutter needs pure two-tone. A scroll-saw maker in a Windows imaging question hit exactly this gap. Push the threshold to solid black and white, not a gray wash.

✔️ Tracing a photo straight into a cutting machine.

Drop a cluttered PNG into Cricut Design Space and the auto-trace produces hundreds of tiny fragments that take forever to weed. Clean the image and export a proper vector instead.

✔️ Assuming you still have a built-in B&W tool.

The black-and-white option many people relied on in MS Paint was removed in a Windows update, so use a dedicated stencil maker for high-contrast output.

Sketch Drawer Sketch Drawer
Make a picture stencil free: use the in-browser stencil maker, or download Sketch Drawer software for Windows - presets, batch, and Cricut/SVG-ready output.
Sketch Drawer Screenshot.
Sketch Drawer

Sketch Drawer

Languages
File Size

53.9 Mb

Version

12.0

Last updated on

12/05/26

$ 19.99

🖥️ System Requirements

  • Windows 11/10/8.1/8/7 (32/64 bit)
  • Intel i3, AMD Ryzen 5 or above
  • 4 GB of RAM or above
  • NVIDIA® GeForce® series 8 and 8M, Intel® HD Graphics 2000, Quadro FX 4800, Quadro FX 5600, AMD Radeon™ R600, Mobility Radeon™ HD 4330, Mobility FirePro™ series, Radeon™ R5 M230 or higher graphics card with up-to-date drivers
  • 1280 × 768 screen resolution, 32-bit color
  • 1 GB of free hard disk space or above


🙋Frequently Asked Questions

Use the in-browser stencil maker at the top of this page. Drop a photo and download a black-and-white PNG for free, with no sign-up. For repeat work, the Sketch Drawer trial converts photos to stencils on Windows.

SVG, because cutting machines read vector paths. Export PNG or PDF only when you plan to print and cut the stencil by hand.

Add bridges, the thin tabs that connect each island to the rest of the stencil before you cut.

The background and fine detail each became a separate shape. Crop tight, raise contrast, and simplify with the threshold before exporting.

Yes. The browser tool downloads a clean PNG. The Sketch Drawer trial adds a small watermark; a license saves without it, and you can add your own logo if you want one.

No. Pick a high-contrast photo, set the threshold so shapes read clearly, add bridges, and export. The presets in Sketch Drawer handle the look for you.

Sources

Rate Stencil Maker Software

  • Windows 7
  • Windows 8
  • Windows 10
  • Windows 11
Author: SoftOrbits (English)
Avg. rating: 4.5 from 827 votes

Risk-free download

14-day money-back guarantee
Full refund, no questions asked
progressive-webapps/apis/offline-first Created with Sketch.
100% offline
Your files never leave your PC
Safe & secure download
Directly from the official website
No sign-up required
No account or email to get started
Trusted since 2006
Desktop software for Windows