SoftOrbits Photo Retoucher clears dust spots, fine scratches, and small blemishes so vintage shots look crisp again.

  1. 1️⃣ Download and Install Photo Retoucher.
  2. 2️⃣ Open the Photo.
  3. 3️⃣ Select Removal Tool.
  4. 4️⃣ Adjust Settings (Optional).
  5. 5️⃣ Remove dust spots from photos.
Eugene - CEO at SoftOrbits, Candidate of Technical Sciences, has more than 16 years of expertise in software development, photo and multimedia applications, enhancing and transforming digital images and videos.
📅 Last updated on:  2026-04-12

Enhancing old pictures is easy with Photo restoration software that includes automatic dust and scratch removal with a single mouse click.

How to Use Dust and Scratch Removal Software

Scan the original image

The first step is to make a digital copy of the photo you want to restore.

This can be done by scanning the physical image using a digital scanner or your phone. Unless you are a professional restorer who has to process hundreds of photos, you can download a scanning app for your smartphone and use that for free.

However, sometimes a scanned image needs to look lighter and more natural. In that case, you can photograph the physical copy. Focus carefully and take a photo that does not need heavy cropping so you have a high-quality digital version ready.

You are ready for restoration after scanning or taking a photo of the original.

Load the image in dust removal software for laptop use

Add file into program..

After you start your dust removal software, you will see Add File in the corner. Use it to load the photo in the program and begin editing.

Use the AI restoration and colorize option

Use the AI restoration tab for AI dust and scratch removal on uneven damage. Let AI handle the heavy lifting, then refine edges and faces for a clean finish.

Colorize photos..

Select the Remove Tool

Select the option for removing scratches..

In the toolbar on top, you will see an icon marked Remove. Selecting it lets you mark damaged or scratched areas and remove them quickly.

Highlight the damaged areas

Select the damaged area..

Before you mark the areas to be restored, select the pencil icon from the right panel first.

This changes your mouse pointer to a small dot. Left-click and drag with the pointer to highlight the damaged area. If there is a scratch or a stain, drag over it and mark it in red.

Remember to adjust the pencil size to match the damaged area!

The software also gives you different options for selecting the area to be restored. Instead of a pencil, you can use the rectangular shape option to draw a box. This saves time when you do not need to trace the whole region by hand.

Click Remove

Result..

Once you have selected the areas to be cleaned up, click Remove at the bottom right corner. The program analyzes the pixels and cleans them up automatically without obvious traces.

SoftOrbits Photo Retoucher SoftOrbits Photo Retoucher

Restore and enhance old photos with SoftOrbits Photo Retoucher, AI-based photo restoration software. Remove scratches, reduce noise, and colorize black-and-white images automatically with AI.

Video Tutorials

Key Features

  • User-friendly interface designed for beginners.
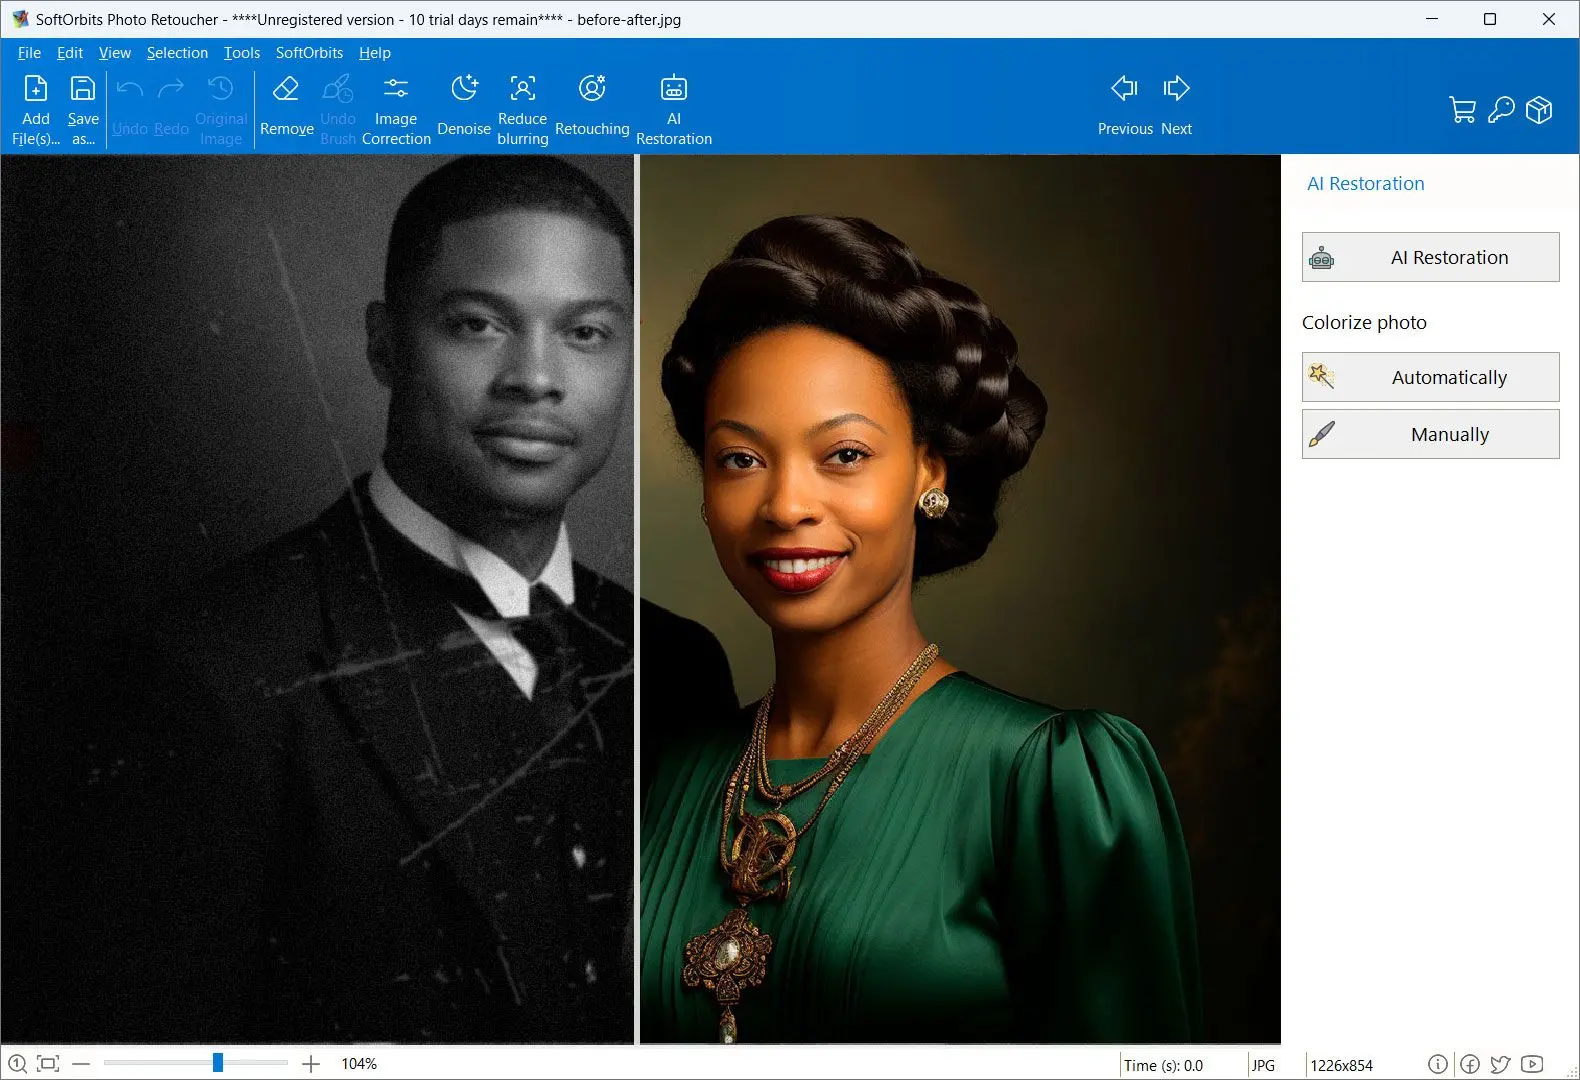
  • One-click old photo recovery including dust and scratch removal and colorization, plus face restoration.
  • Unlike many AI-only tools, it preserves face detail when you dial the effect back.
  • Includes both automatic and manual tools for flexibility.
  • Additional restoration features such as blemish removal and color correction.

Detailed Features

After removing scratches, stains, date stamps, and similar flaws, you can keep working in the same editing program.

Image Correction

Select image correction..

No photo can be restored entirely without slight brightness, contrast, and white balance adjustments.
Clicking Image Correction in the toolbar opens lighting controls such as contrast, tint, gamma, and temperature.
You will not need another app just to fix exposure.
There is also an Auto Correction button where the program adjusts parameters for better exposure and white balance.

Colorize Option

Colorize images..

Photo Retoucher includes an automatic colorize option under the tools on top.
For black-and-white images, the program analyzes regions and fills them with plausible color. Adding color to a faded print often brings the scene back to life.

Manual Cleaning Tools

Some areas may not clear in one pass on heavily damaged scans. In those cases, try the following three options for restoration, which give finer control over how each spot is removed:

Clone Stamp Tool

Select Clone Stamp Tool..

Clone stamp features help photographers copy one part of the image over another. You can duplicate texture or cover a flaw with a clean patch.
Photo Retoucher places a Clone stamp tool in the toolbar. You choose the source area that will hide the scratch or stain.

How to use clone stamp:

  1. After opening the photo, select the Clone Stamp icon from the toolbar. Your mouse pointer will look like a cross.
  2. Select the good area that will be cloned to cover the part you want to fix. Before that selection, adjust the brush size. Increase the brush size when you need to clone a large region, such as shells along a shoreline.
  3. Hold Alt, left-click to set the source, then brush over the area. For old photo restoration, pick a clean area that matches the background near the damage.
  4. When you are done sampling, stamp over the bad region. Release Alt, position the brush, and paint over the flaw.
  5. As you paint, the sampled area is repeated over the damaged region.

This method works well for minor scratches that cross different parts of the frame. By changing the clone source to follow background color, you can erase the scratch in small steps.

Smudge Tool

Select Smudge Tool..

You can use the Smudge tool to blend a problem patch with its surroundings.
A few clicks on the affected area can soften the spot so it sits more naturally in the background.

SoftOrbits Photo Retoucher SoftOrbits Photo Retoucher
Clean scanned prints and old photos with desktop dust and scratch removal software. Photo Retoucher targets specks and hairline marks on Windows so you can restore clarity without fighting every pixel by hand.


🙋Frequently Asked Questions

It cleans small defects such as dust spots, hairline scratches, and paper texture noise so the image looks clearer without heavy manual cloning.

Not exactly. Dedicated tools focus on defect cleanup and often use smarter detection than a basic blur or clone brush, which helps preserve fine detail in faces and edges.

Yes. AI-assisted modes can suggest repairs on uneven damage, but you should still review portraits and high-contrast areas to avoid smeared skin or lost texture.

Desktop photo dust removal software usually handles large scans, 16-bit files, and batch jobs more comfortably. Mobile apps are fine for quick fixes on small JPEGs.

No. It typically means you run the program on your laptop to clean scanned prints, archival photos, or digital images—not only webcam shots.