Resize or crop a whole folder of images on your PC without opening every file by hand.

  1. 1️⃣ Download Batch Picture Resizer.
  2. 2️⃣ Add Images.
  3. 3️⃣ Set Size or Crop Area.
  4. 4️⃣ Click Run button.
Batch Picture Resizer Screenshot.
Eugene - CEO at SoftOrbits, Candidate of Technical Sciences, has more than 16 years of expertise in software development, photo and multimedia applications, enhancing and transforming digital images and videos.
📅 Last updated on:  2026-04-12

How do you resize or crop multiple images at once on a Windows 11 PC?

Several desktop tools can handle it, and Batch Picture Resizer is built for batch work on Windows. It resizes by pixels or percentage, keeps aspect ratio when you want, and offers smart cropping when you need an exact output size. You can also convert formats, rotate, mirror, or flip images in the same pass.


Way #1: Using Batch Picture Resizer to Resize or Crop Multiple Images at Once in Windows 11, 10, 7

Tap Add Files (or add a folder) and upload your images.

Add files to batch resize multiple images in Windows 11.

Enter width and height, then turn on Maintain Original Aspect Ratio if you want proportional scaling. If you need an exact output width and height, use Smart Cropping instead.

Smart crop when you resize multiple images in one pass.

Choose a destination folder.

Select destination folder for batch output.

Tap Run to start.

Batch resize multiple images in Windows.

To crop to a canvas size, pick a preset or custom canvas and apply it across the batch before you run the job.

Choose output size before you batch crop images on Windows.

Batch Picture Resizer Batch Picture Resizer

Batch Image Resizer is an easy, user-friendly tool that helps you resize multiple photos, convert, flip, mirror, or rotate them in batch mode.

How to resize all images in a folder

Resizing every image in a folder with this SoftOrbits app is straightforward. Set percentage or pixel dimensions, pick output format options if needed, and run the batch on the whole list. Here is a simple workflow:

How to crop multiple photos at once in Windows 10

  1. To crop multiple images at once, add the folder (or files) to the program.
  2. Use Smart Crop when you need a fixed frame, or keep Maintain Original Aspect Ratio for proportional resizing.
  3. Choose Replace Actual Files in the destination box only if you intend to overwrite the originals.
  4. Run the job and review a few outputs before you overwrite a large archive.

To make JPEG files smaller, adjust the JPEG compression ratio in the output settings. It is an easy option in this Windows 11-friendly tool. Follow these steps:

Reduce JPEG file size with compression options.

  1. Tap Add Files to add pictures.
  2. Set a new resolution in pixels (width and height) or use a percentage of the original size.
  3. Pick a destination folder.
  4. Tap Run.

Format and aspect ratio

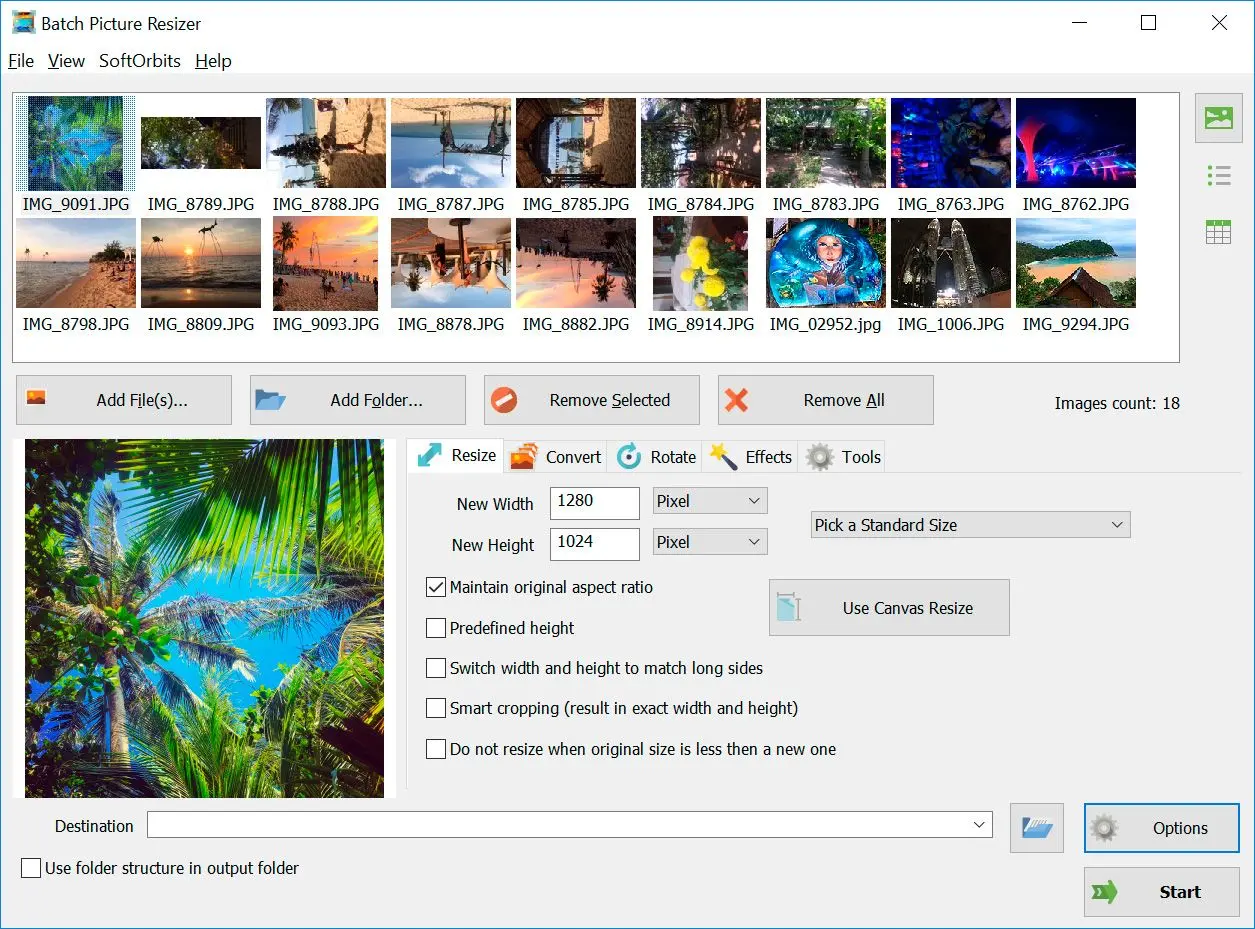
This workflow helps you reach a target size without guesswork. Use this guide to adjust dimensions and keep files consistent:
Batch resize images on Windows 11 with Batch Picture Resizer.

  1. Add images with Add File or Add Folder, or drag and drop files into the window.
  2. Pick a standard preset if you do not have exact numbers, or enter width and height in pixels or percent.
  3. Review resizing options when aspect ratio matters. Useful choices include:
    • Maintain Original Aspect Ratio.
    • Fix one side (for example, height) and let the other scale proportionally.
    • Match long edges when you need consistent thumbnails.
    • Use Smart Cropping when you must hit exact width and height by trimming edges.
    • Avoid heavy upscaling when the source is much smaller than the target size.

Adjust output format

You can keep the original format or convert during the batch. When you work with JPEG, adjust DPI and quality if your delivery spec requires it, then pick a destination folder. Choose Overwrite Actual Files only when you mean to replace the originals. When everything looks right, click Run.

Way #2: How to batch resize multiple images in Photoshop

Processing a folder in Photoshop is doable with Actions and the Batch dialog. Follow these steps:

Open the Actions panel and tap Create Action. At the bottom, click New. Name the action (for example, Resize Pictures).
Photoshop - Create Action to resize multiple images.

Click Set, create a new set, or choose Default.
Photoshop - create set.

Optionally assign Function Key shortcuts and a color label for the action.
Photoshop color coded function for resizing images action.

Click Record, then go to Image → Image Size.
Photoshop - Record action for resizing multiple photos.

Choose units such as Pixels, Percent, or Inches, set the new size, and confirm.
Photoshop - resize multiple images.

Click OK, then open File → Save As.
Choose a folder for the resized files, set options, and click Save and OK.
Close the image.
In the Actions panel, click the Stop icon.
Save image resizing action.

Choose File → Automate → Batch.
Crop images in Adobe Photoshop.

Pick the source folder, choose the action you recorded, set a destination folder, and click OK. Confirm that exports land in the folder you expect.
Start image resizing action in Photoshop.

Way #3: Resize or crop multiple images on macOS

  1. Apple Preview can resize images on macOS. Open the folder that contains the pictures you want to adjust.
  2. Select the files, then double-click to open them in Preview, or right-click and choose Open With → Preview.
  3. Go to Edit and choose Select All.
  4. Open Tools → Adjust Size.
    Resize multiple images on macOS.

  5. Enter the width and height you need.
  6. Choose File → Save All when you are finished.

Batch Picture Resizer Batch Picture Resizer
Batch resize multiple images on Windows 11 or 10: set width and height, keep aspect ratio, or use smart crop for a folder of photos. Download Batch Picture Resizer free to try it on your own files.
Batch Picture Resizer Screenshot.


🙋Frequently Asked Questions

iOS does not offer a true folder batch editor like desktop tools. Use a dedicated batch app on your computer (for example, Batch Picture Resizer), then sync or AirDrop the results to your iPhone.

Use Batch Picture Resizer on Windows. Set width and height to the same value (for example, 1080×1080) and use Smart Cropping if you need to trim uneven originals to that frame.