
 Batch Picture Resizer
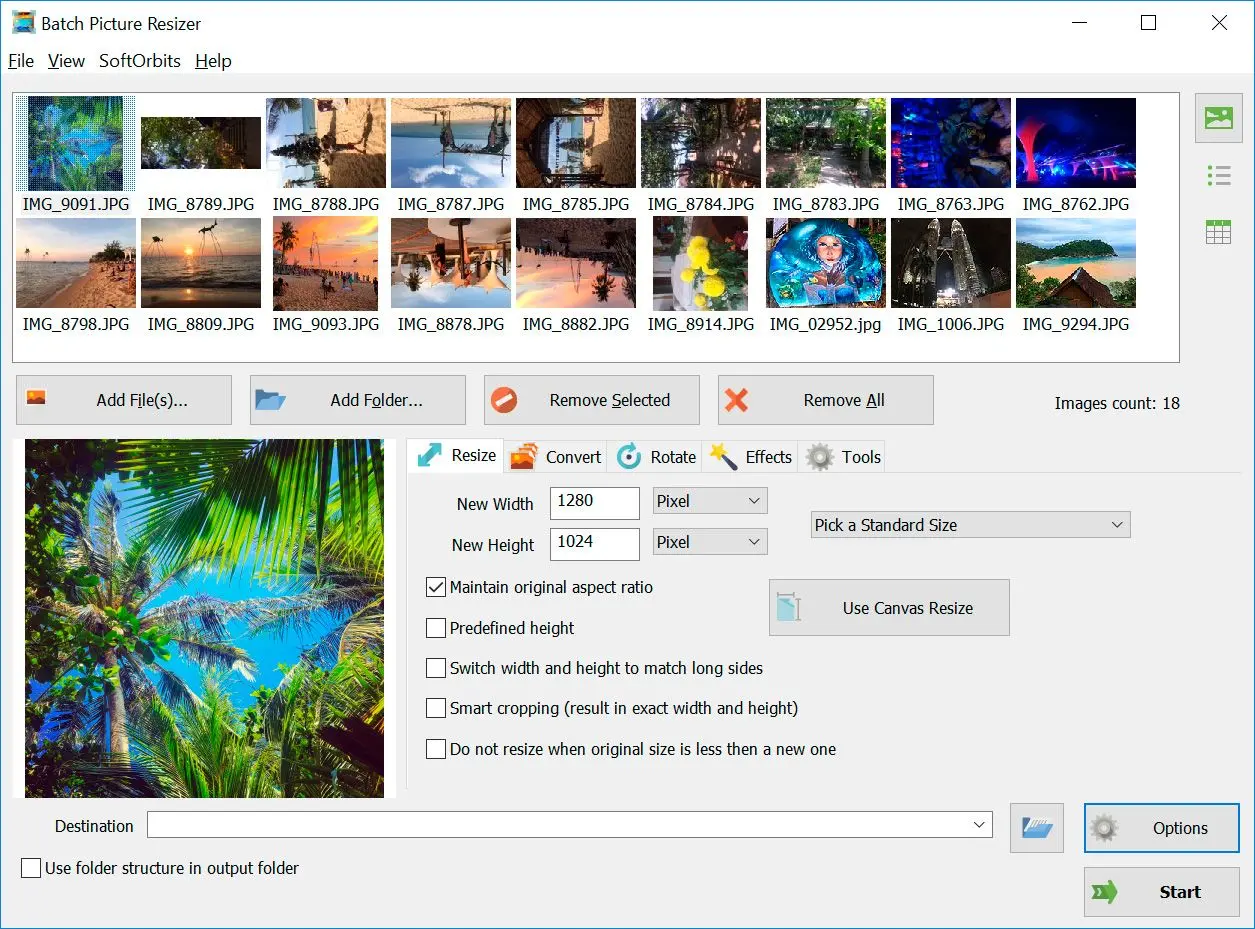
Batch Image Resizer is an easy, user-friendly tool that helps you resize multiple photos, convert, flip, mirror, or rotate them in batch mode.
MB to KB converter app for PC: shrinking a large photo down
A photo measured in MB is usually just too many pixels saved at maximum quality. Resize the dimensions and re-save as JPG and the same image lands in the KB range.
"MB to KB converter" sounds like a unit change, but nothing converts. You are throwing away data you do not need. A 5 MB camera JPG holds far more detail than a website or an email attachment will ever show. Resize it to the size it will actually be viewed at, export as JPG at a sensible quality, and 5 MB becomes 300-500 KB. RAW and TIFF files are the extreme case: a single TIFF can run 30-60 MB, which is why people batch-convert them to JPG before sharing. The point is the same at every size. Match the photo to where it is going, not to what the camera captured.
Reduce hundreds of photos at once (batch)
Desktop software applies one target size and format to a whole folder at once, using every CPU core, so a few hundred images take a minute instead of an afternoon.
One photo is easy anywhere. The pain starts at volume. A user on the Tom's Guide forum describes the standard fix. Shoot large, then batch-resize the whole set in one pass. Online tools usually cap you at 10 or 20 files and one upload at a time, which falls apart when you have 500 product shots or a wedding gallery.
Batch mode in desktop software loads a folder, applies the same KB target and output format to every file, and writes the results to a new folder using all CPU cores. You can convert a folder of Canon CR2 files, Nikon NEF files, or mixed formats in the same run. Set it once, hit Start, walk away.
Image Size Reducer App for Pc Vs Online Mb To Kb Converter tools
Online tools are fine for one quick photo. For private files, large batches, or repeat work, desktop software wins on privacy and volume because nothing leaves your PC.
Both kinds of tool shrink a photo's KB, so the choice is really about your files, not features. An online reducer is genuinely the faster pick when you have one harmless photo and an empty afternoon. No install, drag and drop in the browser, done. The catch is that the photo travels to someone else's server to get there.
For a passport scan, a contract photo, or a folder of client work, that is a real problem. Desktop software does the whole job offline, so confidential images never leave your machine, and there is no per-batch upload limit. My take after years of this: keep a desktop resizer for anything private or bulk, and use a browser tool only for the occasional throwaway image. The privacy and batch ceiling are not edge cases. They are the two reasons people switch.
JPG vs PNG: which format is smaller in KB?
For photos, JPG is almost always smaller than PNG. Keep PNG only for graphics with text, sharp edges, or transparency.
Format choice is the most common reason a file is unexpectedly huge. For a photo with millions of colors, a JPG is usually several times smaller than the same image saved as PNG, because PNG compression is lossless. That is great for screenshots, logos, and anything with crisp lines, and poor for squeezing a beach photo down to a few KB. For a flat logo or icon, a vector format like SVG is the real answer, since it stays sharp at any size with no KB concern at all.
So if you saved a photo as PNG and it weighs 8 MB, the fix is usually not "compress harder," it is "save as JPG." Keep PNG when you need a transparent background or pixel-perfect text. For everything photographic, switching to JPG with a format conversion tool is the single biggest KB cut you can make.
Old BMP files are the same story. A quick conversion to JPG turns a bloated bitmap into a small JPG.
Image size for government forms, visa, and passport photos
Government portals set hard KB and pixel limits. Resize to the required dimensions first, then compress to land inside the file-size window, not under it.
Government photo rules are where exact-KB targeting really bites. The U.S. State Department requires a square JPG between 600 x 600 and 1200 x 1200 pixels and at or under 240 KB. Job portals, college applications, and exam forms each have their own ceiling, often 50 KB or 100 KB, plus a minimum no one mentions until the upload fails.
Picture the 11pm version of this. The form is due, the upload keeps bouncing with "file size out of range," and you have no idea if you are over or under. The reliable path is boring on purpose. Resize to the exact pixel size the form asks for, export as JPG, and check the KB. If you are over the ceiling, drop the quality a notch. If you somehow fell under the minimum, raise it. Aim to sit comfortably inside the window, not to break the record for smallest file.
How to shrink image size in KB without losing quality
Modest resizing plus quality around 80 is invisible to most eyes. Quality drops fast only when you force a tiny KB target or re-save the same JPG many times.
"Without losing quality" is a small fib. JPG is lossy, so every save drops a little data. The honest version is "without losing quality you can see," and that is very achievable. Keep JPG quality around 80, resize to the size the image will actually be shown at, and the result looks identical to the original at normal viewing distance.
Quality only falls apart in two situations. The first is an extreme target. Forcing a detailed photo into 15 KB adds blocky JPG artifacts around edges and smooth gradients. The second is repeated re-saving, covered below. This is also why a good KB target works in your favor: the tool tests compression levels in memory and writes the file only once, so you skip the generation loss that piles up when you save the same JPG again and again. Good software lets you preview or compare before you commit, so you can find the sweet spot instead of guessing.
Why Batch Picture Resizer fits this job
Batch Picture Resizer is a Windows desktop tool that targets an exact KB or MB size, processes whole folders offline, and saves to a new folder so originals stay safe.
If you want a desktop option built for this job, Batch Picture Resizer covers the workflow above end to end. It reads dozens of input formats, including RAW, HEIC, WebP, TIFF, and PSD. The output target can be an exact size in KB or MB. If you'd rather work in dimensions, set a percentage or fixed pixel width and height instead.
Targets an exact file size in KB or MB and auto-picks the JPG quality, downsizing only if needed
Batch-processes whole folders on every CPU core, fully offline
Saves to a separate folder, so your originals are never overwritten
Reads RAW, HEIC, WebP, TIFF, PSD and common formats in one place
Windows 10 and 11 only, no Mac build
It is a focused resizer and converter, not a full photo editor
Batch Image Resizer is an easy, user-friendly tool that helps you resize multiple photos, convert, flip, mirror, or rotate them in batch mode.
Pitfalls when reducing image size in KB
Most failed attempts come from changing DPI instead of pixels, saving the wrong format, or re-compressing the same JPG until it falls apart.
This is the big one. DPI is just a print tag in the metadata. On screen and for upload, it is ignored. As a Quora answer on the question spells out, moving a file between 72 and 300 DPI changes nothing but a header field. Drop DPI from 300 to 72 and the KB number does not budge. Resize the pixel dimensions instead.
PNG is lossless and bloats photos. People in the Adobe community hit this when a whole batch stays huge. If your "compressed" image is still megabytes, check the format before you compress harder. A JPG export is usually the real fix.
Each edit-and-save throws away a little more data; the generation loss stacks up like a photocopy of a photocopy. Edit from the original and export once.
Set the floor too low and you get blocky skies and fuzzy text that some biometric portals reject outright. A Quora question about crushing a photo from 250 KB down to 20 KB draws the same warning: past a point, squeezing harder only trades away detail you needed. Aim to fit the limit, not to undercut it by 90 percent.
Greyed-out results or a file that still busts the limit? Resize the pixel dimensions first, then compress. As people keep asking in Quora threads on shrinking KB without touching dimensions, doing it in the wrong order leaves you fighting the quality slider for no reason.
Will my originals be overwritten?
Not if you save to a different folder. Good desktop software writes the smaller copies to a new location and leaves the source files alone.
Overwriting the source is the fear that keeps people on slow, manual methods, and it is easy to put to rest. Any tool worth using lets you pick a separate destination folder, so the compressed versions land there while the originals stay exactly where they were. Before a big batch, do a quick test on five files and confirm the output folder is the one you expect. Keep the originals until you have verified the results - storage is cheaper than a reshoot.
 Batch Picture Resizer
Sources